Super Fun News!! Light Up Card Making Kit with Lawn Fawn has released!!
Hi everyone,
I am super excited I can’t be still! Chibitronics and Lawn Fawn have released the collaboration kit, Charge Me Up: light up card making kit with Lawn Fawn.
I am so happy to join this collaboration showcasing because my friend Eiko (her name is pronounced A-ko) designed the cards included the kit. I am really proud of her.
The kit was sold out super quickly after release in 24hr at both site Lawn Fawn and Chibitronics. Wow! It's an amazing collaboration kit.
I love the name of this stamp set, Charge Me Up. Absolutely, this kit makes me be charged up to full!

Chibitronics DT and Lawn Fawn DT members are showing many projects to you these 3 days, it is so fun for me and I hope you enjoy seeing many cards using this adorable stamp set and Chibitronics. Please keep tuning on Chibitronics Blog and Lawn Fawn Blog. You will be inspired by many nice works there. You can join the Giveaway every post comment
OK. I show you my projects here. I made two cards to share with you today.
The first card is the toadstool mini card with the template included in the kit.
Second is the light up picture changer card using the Charge Me Up stamp set with original circuit.


When I was little, I was dreaming to live the toadstool house like this. “Knock, knock!” “ Who’s there?” " It's me".... Open the door and push inside, then the window of the toadstool house glow up. It’s so cute and reminds me of some nostalgic feeling.
・Butterfly kisses stamp and die
・Paper; Neenah super crest #110, #80, some kinds of color card stocks for mushroom
・white vellum for the window of light
・Chibitronics LED sticker yellow
・Copper tape
or
・Coin cell battery 3V CR2016 (CR2032 is in the kit if you want to use CR2032, you need to stack your foam over 4.5mm)
・Foam sheet: The thickness should be more than 1/8 inch for CR2016 Battery.
・Copic Markers or other coloring tools what you like

・Mushroom, cut out the window, stick all mushroom parts assemble. Die cut the folded card base to mushroom shape.
・The Circuit template
 ・Switch part
・Foam sheet The thickness needs more 3mm =1/8inch for the combination of CR2016 Battery. Die cut it to the foam of mushroom and cut inside making the rim for mushroom.


***************************************************************************
The making of the push switch can be tricky sometimes. It should keep the appropriate space for “on” and “off” states of the switch and the battery. If your switch gets in the status keeping light on, please check out my last post in this blog. I wrote the TIPS for the push switch. The key word is "Don't leave the light test".

-----------------------------------------------------------------------------------------------------------------
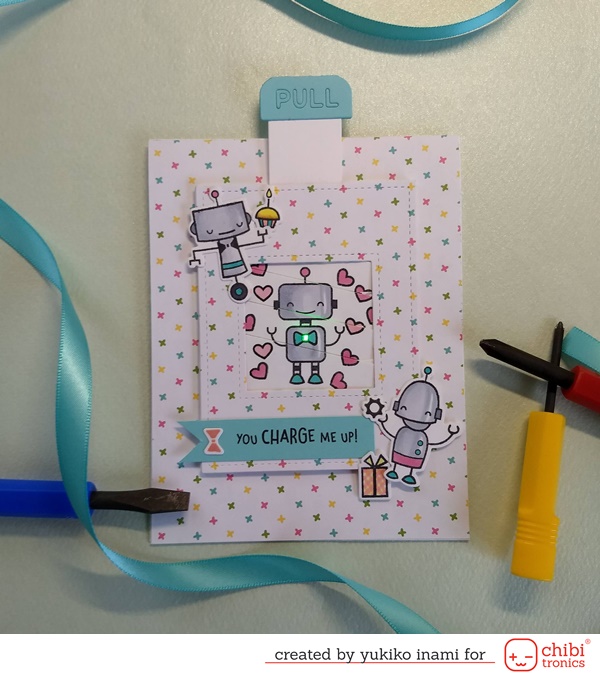
In this time I use the sweet robot pals stamps.
At first, a robot is a low battery mode. When you pull the picture changes to full power and light up a smiling robot. His pals charge him up. I have many good friends like in this picture. I’d like to say thank you them sending this card :)


・Make a slit for the pull tab switch :
Slit Position; 1/4 inch from the center scoreline
Direction; vertical
Slit Size 1/16 inch width, 11/8 inch length
・Put the switch part in the slit and slide to the upper edge
and mark the connecting path of the circuit.

・Set the double-sided tape on the place of the battery.
・Peel off the release paper on the Battery place then stick the negative path copper tape start from the marking of LED negative pad to the negative side of the battery.
・Place the battery on the copper tape with the positive side up.
・Stick the copper tape on the positive path from the backside go through the slit and the positive side of the battery.
・Stick the copper tape from the backside goes through the slit to the LED positive pad mark.
・Then put the LED stickers on the mark.
・Put the switch in the slit and test the switching work well.
・After you confirm that the lights work well when the slit switch slide in the place, reinforce the connection of LED stickers and copper tape path with sticking the short copper tape on each edge of LED stickers.
・Stick the edge tab folded
・Set in the changer panel in the pocket.
・Slide up the picture changer insert panel and change the picture. This position is for the switch on, so set the switch on the light on position.
・Set the foam tape on the edge of the pocket side rim.
・And now stick the switch on the back side of the insert panel.
1)Slide up to the top position the insert panel
2)The switch parts move to the top side of the slit and confirm that light on.
3)Stick the double sided tape on the switch parts backside
4) Peel off the release paper of the switch part and foam tape.
5) Make sure that the insert panel good place, parallel and not sticking in the foam tape
6) Close the pocket lid
・Now you completed the picture changer parts.
・Set the frame on the picture changer parts.
・Stick the top panel on the card stock.
・Set the picture changer parts on the card stock.
Did it!
You can use this kit in many ways.
The light up moment makes you smile.
Have fun and light up your world!
Thank you stopping by!
Yukiko I. (Nicorin)
I am super excited I can’t be still! Chibitronics and Lawn Fawn have released the collaboration kit, Charge Me Up: light up card making kit with Lawn Fawn.
I am so happy to join this collaboration showcasing because my friend Eiko (her name is pronounced A-ko) designed the cards included the kit. I am really proud of her.
The kit was sold out super quickly after release in 24hr at both site Lawn Fawn and Chibitronics. Wow! It's an amazing collaboration kit.
Chibitronics DT and Lawn Fawn DT members are showing many projects to you these 3 days, it is so fun for me and I hope you enjoy seeing many cards using this adorable stamp set and Chibitronics. Please keep tuning on Chibitronics Blog and Lawn Fawn Blog. You will be inspired by many nice works there. You can join the Giveaway every post comment
OK. I show you my projects here. I made two cards to share with you today.
The first card is the toadstool mini card with the template included in the kit.
Second is the light up picture changer card using the Charge Me Up stamp set with original circuit.
Toadstool Light Up Mini Card~~Using the template included the kit
When I was little, I was dreaming to live the toadstool house like this. “Knock, knock!” “ Who’s there?” " It's me".... Open the door and push inside, then the window of the toadstool house glow up. It’s so cute and reminds me of some nostalgic feeling.
Supplies
・Mushroom house die・Butterfly kisses stamp and die
・Paper; Neenah super crest #110, #80, some kinds of color card stocks for mushroom
・white vellum for the window of light
・Chibitronics LED sticker yellow
・Copper tape
or
・Coin cell battery 3V CR2016 (CR2032 is in the kit if you want to use CR2032, you need to stack your foam over 4.5mm)
・Foam sheet: The thickness should be more than 1/8 inch for CR2016 Battery.
・Copic Markers or other coloring tools what you like
Make the Parts
Die cut the Parts:・Mushroom, cut out the window, stick all mushroom parts assemble. Die cut the folded card base to mushroom shape.
・The Circuit template
・Foam sheet The thickness needs more 3mm =1/8inch for the combination of CR2016 Battery. Die cut it to the foam of mushroom and cut inside making the rim for mushroom.
Make the circuit on the surface of the card base
・Stick the switch parts on the place marked.
 |
・Stick the copper tape on the path both of positive and negative.
・Set the LED sticker the light position. Make sure the right position. The base side of LED sticker is positive and the pointed tip side is negative.
・Set the battery in the switch and test the light work.
・Stick on the copper tape both edge of the LED sticker to make a nice connection to the circuit.
Assemble
・Set the foam sheet rim on the circuit panel.
・The small tips of foam sheet stick around the battery space.
・Set the top mushroom panel on the circuit panel.
All set!
***************************************************************************
The making of the push switch can be tricky sometimes. It should keep the appropriate space for “on” and “off” states of the switch and the battery. If your switch gets in the status keeping light on, please check out my last post in this blog. I wrote the TIPS for the push switch. The key word is "Don't leave the light test".
-----------------------------------------------------------------------------------------------------------------
The light up picture changer card
Another project for today is the light up picture changer card. I had fallen love the picture changer die at Creativation 2019. I decided that I try to light up this picture changer. And I made the house picture changer card the day to the night before.In this time I use the sweet robot pals stamps.
At first, a robot is a low battery mode. When you pull the picture changes to full power and light up a smiling robot. His pals charge him up. I have many good friends like in this picture. I’d like to say thank you them sending this card :)
Supplies
・Beep boop birthday stamps and die; This set retired and just only the die last now on sale.
・Coin cell battery 3V
・Foam tape
・Double-sided tape
・Copic Markers or other coloring tools what you like
Make the parts
・Die cut the magic picture changer and stamped. Make a hole at the center of the robot tie.
・Score the line upper 2mm from the slit for a gusset.
・Pull part
・Top panel 4 1/8 x 5 1/2 inch pattern paper; Rebecca
die cut with magic picture changer add on's frame die
・Card base, 8 1/4 x 5 1/2 inches; folding half
・Switch parts: 1 1/2 x 1/2 inches Score 1/4, 1/2, 1, 1 1/4
Fold to mountain, valley, valley, mountain
・White vellum for the window of light
・Robots and gift box parts; stamp, die cut and color
・Make a banner and stamp sentiment
Drawing the circuit and cut some slits
・Draw a circuit on the backside of pocket part.・Make a slit for the pull tab switch :
Slit Position; 1/4 inch from the center scoreline
Direction; vertical
Slit Size 1/16 inch width, 11/8 inch length
・Put the switch part in the slit and slide to the upper edge
and mark the connecting path of the circuit.
・Mark the place of the battery.
・Set the double-sided tape on the place of the battery.
Make the circuit; refer to the movie
・Stick the copper tape on the drown path.・Peel off the release paper on the Battery place then stick the negative path copper tape start from the marking of LED negative pad to the negative side of the battery.
・Place the battery on the copper tape with the positive side up.
・Stick the copper tape on the positive path from the backside go through the slit and the positive side of the battery.
・Stick the copper tape from the backside goes through the slit to the LED positive pad mark.
・Then put the LED stickers on the mark.
・Put the switch in the slit and test the switching work well.
・After you confirm that the lights work well when the slit switch slide in the place, reinforce the connection of LED stickers and copper tape path with sticking the short copper tape on each edge of LED stickers.
Assemble
・Fold the edge of the pocket parts of the picture changer panel.・Stick the edge tab folded
・Set in the changer panel in the pocket.
・Slide up the picture changer insert panel and change the picture. This position is for the switch on, so set the switch on the light on position.
・Set the foam tape on the edge of the pocket side rim.
・And now stick the switch on the back side of the insert panel.
1)Slide up to the top position the insert panel
2)The switch parts move to the top side of the slit and confirm that light on.
3)Stick the double sided tape on the switch parts backside
4) Peel off the release paper of the switch part and foam tape.
5) Make sure that the insert panel good place, parallel and not sticking in the foam tape
6) Close the pocket lid
・Now you completed the picture changer parts.
・Set the frame on the picture changer parts.
・Stick the top panel on the card stock.
・Set the picture changer parts on the card stock.
Did it!
You can use this kit in many ways.
The light up moment makes you smile.
Have fun and light up your world!
Thank you stopping by!
Yukiko I. (Nicorin)


Adorable and funny cards!!! Thanks for sharing this useful tutorial!!!
返信削除Adorable and so fun!! Thanks for the tips!
返信削除